In this article, I describe how you can combine linocut with clay to make reliefs.
Clay is a rewarding material, both for the professional and the hobbyist. Anyone who is just starting with clay will soon have an excellent result.
Clay can be decorated with all kinds of techniques, ranging from simple to difficult. The beauty is that most techniques can be started in a simple way and gradually become more complicated.
Some of the links are affiliate links. As an affiliate associate, I earn a small commission when you purchase any of the products offered through the shared links at no extra cost to you. This helps me to maintain this website and I thank you for supporting me.
Table of Contents
Combine linocut with clay
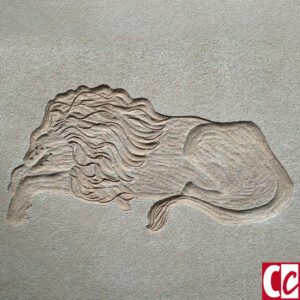
Linocut is a printing method to make images on paper and clay. Another application is to create a decorative raised border in a ceramic tile. Or you can use linocut to create a 3D object with embossed parts.
Linocut is an old technique
The first books were printed with woodcuts in the 15th century. Nowadays we use lino instead of wood. The effect is almost the same, but the main advantage of lino compared to wood is that you are not bothered by the wood grain.
If you want to use an image more often on your ceramics, a linocut is a suitable method. With underglaze, you can print on the clay.
An excellent explanation of how to do this can be found on the Ceramic Arts Network website:
Printing and Embossing Clay With Linocuts
I want to talk about the semi-spatial use of linocut because I’ve always had so much fun with it. Both with making the linocuts and with the final result.
My lino cutter of choice
I have had my lino set since I attended the Academy of Visual Arts. So it must be way over 40 years old. Most of the time when I want to suggest a tool, it has been changed. This one is still available in the exact form. And why shouldn’t it, it’s a marvellous set and with proper care, it’ll last for ages.

If you regularly attend a course, mark your tools with coloured tape or paint so you always know which one is yours.
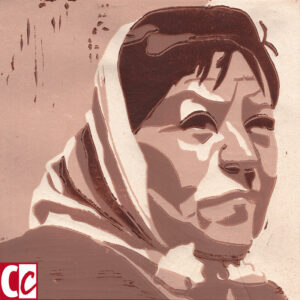
Start in a simple way

Choose a soft and thick kind of lino. The easiest way to start is by making a border for tiles. Get your inspiration for instance from the Arts & Crafts Movement, more specifically William Morris, who made beautiful flower patterns.
If you’d rather have a geometric pattern then do a Google search for geometric borders. You’ll find a lot of examples. Pick a black & white one and translate the black into a cutout.
Note that the result will be an inverted image, so if you want to use text, make it illegible (reversed) in the linocut.
Roll a sheet of clay of an even thickness and gently press the linocut into it. Use a roller or your hands for this. The clay should not be too wet, because then it will stick to the lino when you remove it. But also not too dry, because then it wouldn’t be possible to press in.
Dry the tile slowly, covering it with a loose sheet of plastic at the beginning. If the drying process is too fast, the edges will curl up. With a flat tile, you can prevent this by turning the tile regularly, but this is not possible with a relief tile.
Related: How to Make the Perfect Slabs of Clay
Is imitation a form of flattery?
There was always a lot of talk in my profession about imitation and inspiration. Some said that if you got imitated you should regard it as a form of flattery. I disagree.
I do not believe in plain imitation. If a maker does not know what he or she is doing, even something that is an exact replica will have no soul.
Yet, in the old days, a student would always begin by copying the great masters. This way they learned the trade. After their apprenticeship, they became journeymen and in the end a master themselves.
So start with imitating, learn from your efforts, and try to give it your own twist and you will surely discover new paths and make great things. In time you can expand and refine your options, giving you a lot of tools and skills to choose from.
Step by step more complicated

After various borders and floral motifs in tiles, I wanted to make bowls with relief. If you try new things, a new way of working or a new technique, you will not have an instant result. Well, most of the time you won’t, there are exceptions. But try and don’t give up and you will surprise yourself. I know I did.
I always was more of a designer than an artist. This meant I sketched and drew before I made anything. Other artists are more intuitive and start right away. Both ways of working are fine, I guess. I feel happiest when I make a plan beforehand.
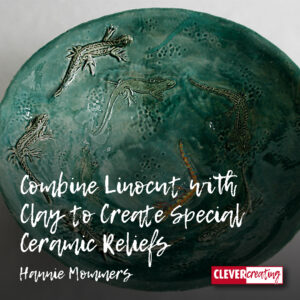
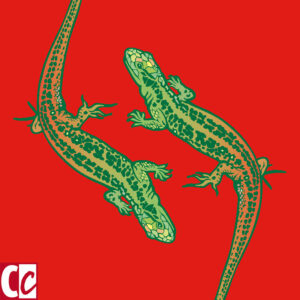
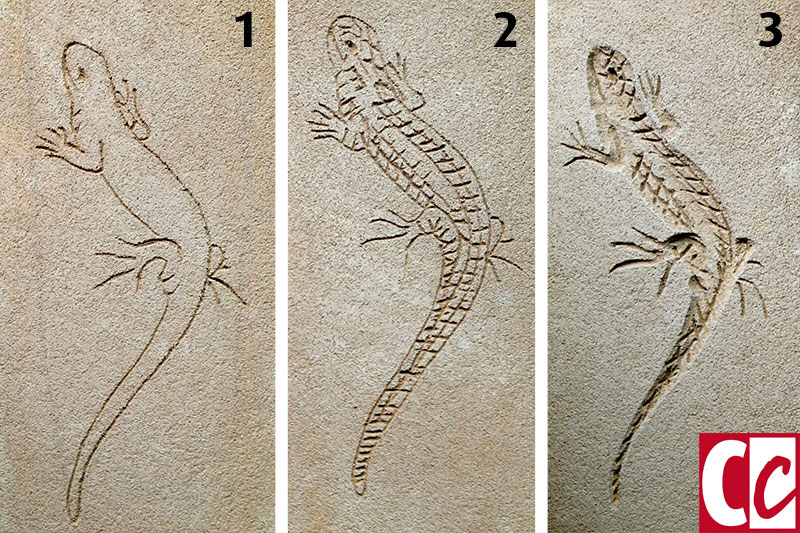
Sketching can be done by hand or by computer. The frogs were drawn by hand, directly on the lino. For the lizard bowls, I sketched the lizard by hand, scanned it and made the layout by computer.

Preparation for the Lizardbowls
My idea was to use embossing that went from more or less flat to higher parts in an imitation of Escher’s Reptiles. I cut three pieces of lino. In one I cut only the outlines (1), the next piece had more texture (2) and the latter had recessed portions (3).
With these lino pieces, I can press in the clay, like a stamp.
Stamped clay
I had several plaster moulds of bowls in which clay could be pressed. Usually, I rolled an oversized slab of clay, pressed it into the mould, and then the edge could be carefully cut off with a plastic knife.
This was not possible for the lizard bowls because the stamps had to be pressed into flat pieces of clay.
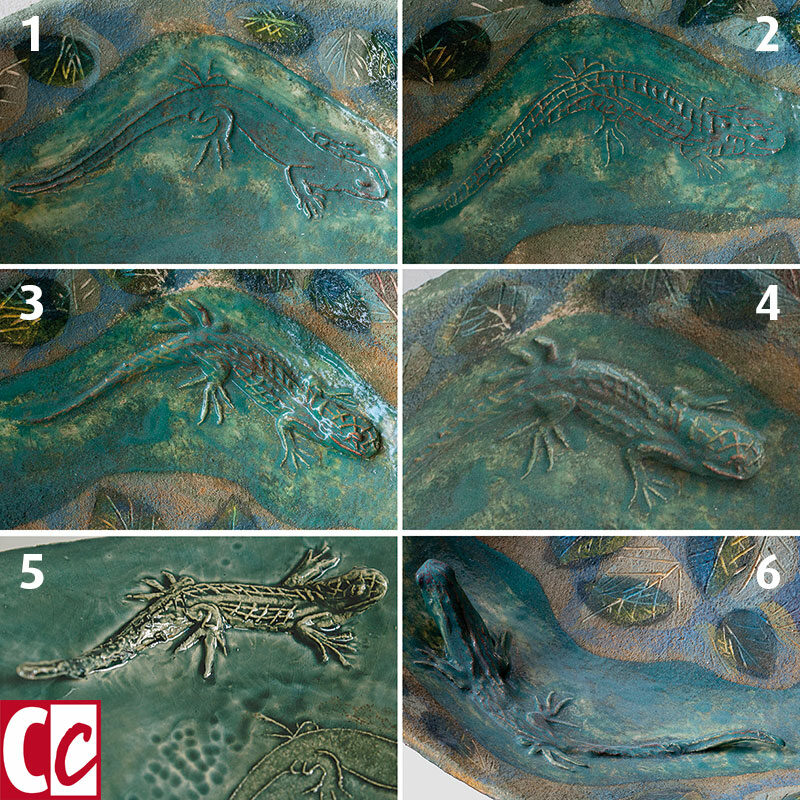
For both bowls, I stamped 6 parts. One of lino #1 and #2, and 4 pieces of lino #3. With a pencil, I drew some guidelines in the moulds to make sure the division was correct. Then I positioned them the way I wanted and finished the rest of the bowls.
Handbuild addition

Three of the stamped parts of lino #3 were altered after assembling. Either a little tail peeked out of the surface, or the body was thickened. Or the head is lifted up completely in 3D. That is why these objects can’t be used as ‘real’ bowls to save something in or as fruit bowls – the protruding parts would break by the first apple that was thrown into them.
The plaster mould extracts moisture from the clay, so it dries. As soon as the form shrunk loose, the back could be finished.
Experimenting and improving each time
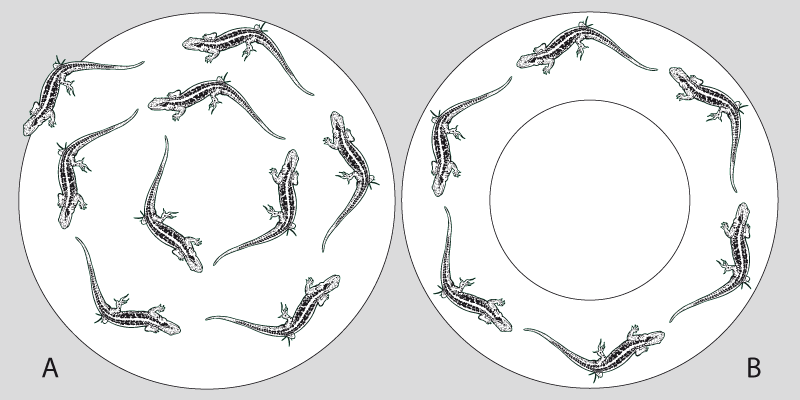
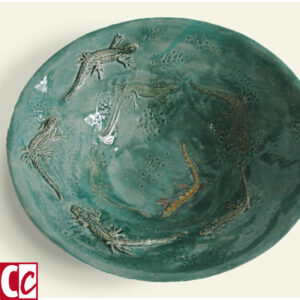
In one bowl (A), the lizards spiral outwards and in the other one (B), they walk one after the other.
The spiral starts with a lizard handpainted in different coloured underglazes. Then the stamped and expanded parts, and finally just the shadow of the last lizard as if it had walked off.
With a wooden bead, I stamped some deepened small circles. By using transparent green glaze as a finish, the deepened and raised parts became darker in colour.
Combining decoration techniques
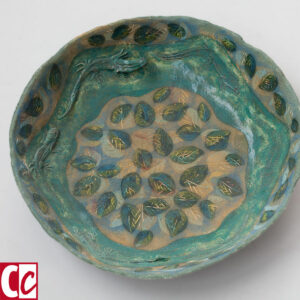
In bowl B, 2 techniques are combined: the relief technique and sgraffito combined with the stencil technique. The lizards are walking in a circle and the background is decorated with leaves.
To decorate ceramics is always very fulfilling. Even the most straightforward techniques give an immediate result, don’t you think?
What is your favourite decoration technique? Tell me in the comment box below.
This article is an update. Originally published on 4-07-2013.
Hi Hannie,
This is so beautiful! I love art a lot and will be glad if I can make similar end products in different patterns. But, here is the question that comes into my mind: Does that require someone to be an artist to be able to come up with something like that?
Thank you so much.
Hi Aubin, I can reassure you, it certainly is not necessary that someone is an artist, or rather feels himself or herself an artist. As the famous German artist Joseph Beuys said: “Everyone is an artist”. What you need is dedication and a sense of experimenting. And not easily give up on yourself if the first, or the second, third, etc trial doesn’t work out right away.
Wanting to learn and at some point experience will get you a long way!
Thanks for your comment and keep on enjoying art!
Hello, Is your artwork for sale?
Thanks.
Yes, it is, Pete. You can email me. 🙂
Regards,
Hannie