
A viewpoint, point of view, standpoint, or outlook. All expressions you can use in either literal sense or as a matter of speech. Here I mean of course your point of view with a camera at hand. What is a viewpoint in photography?
Usually, you will hardly think about where you stand when you take a picture. There’s a party or some other important event, or you’re on vacation and you want to capture those moments.
Still, it is useful to be aware of your point of view every now and then. Anything that expands your toolbox of possibilities improves your photography.
Some of the links are affiliate links. As an affiliate associate, I earn a small commission when you purchase any of the products offered through the shared links at no extra cost to you. This helps me to maintain this website and I thank you for supporting me.
Table of Contents
What is a viewpoint in photography?
Where you stand while you take a picture and how you hold the camera determines your point of view.
Point of view

Keeping your head up
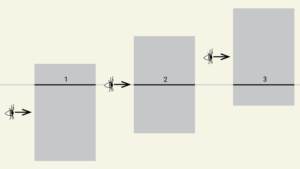
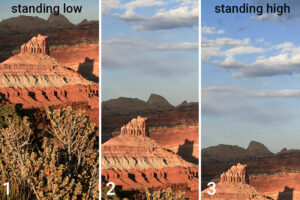
Let’s suppose you are in a glass elevator and you can’t move your head up or down, just left and right. So, you keep on looking right ahead and the horizon is high at the moment you are in the basement. And you make picture 1.
Going up, the horizon will go down, you still won’t move your head and you make picture 2. Let’s call it the ground floor.
On the top floor, you see a lot of sky, the horizon is very low and you take picture 3.
That’s one way of ‘dealing’ with the horizon.
I don’t think you would keep your head as fixed as I described above, would you? It’s more likely you will lift your head when you’re below and look down when you reach the top floor.
Looking up
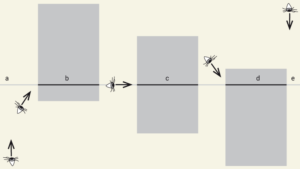
The most extreme lifting up your head is lying on your back and for instance, looking at the trees. It’s called the worm’s-eye view. (a)

Worm’s-eye view
In English, a low standpoint is called the groundfloor perspective or worm’s eye view. In my homeland, it is called the frog perspective. The point of view is looking up and seeing a lot of sky. (b)
Horizon in the middle
Standing in an upright position the horizon is at eye level. (c)

Bird’s-eye view
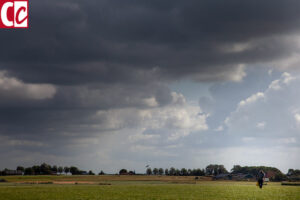
High on a hill or a mountain, flying in the sky, looking down like a bird does. That’s why it is called the bird’s-eye view or the bird’s-eye perspective. (d)
Looking down
And finally looking straight down, to the ground, into a cellar, fill in the blanks. (e)


Move for a better view
Apart from looking up or down to take the best possible photo, it’s also good to look around from right to left and back.
Walk around for a change in the view. Is the image better when you step a bit to the left? Where is the sun and does it lighten up the scene from the side, back, or front?
Zoom
The lens of a DSLR is good enough to zoom in. The quality of the photo remains high.
It is better not to zoom in with a smartphone. The zoom is digital, which means that information is taken from the photo.
In such a case it is better to walk toward the subject. One of my photography teachers called it “making a telephoto with your feet”.
Smartphone
Some mobiles have more than 1 lens. My iPhone has 2 and the pro models have 3.
The 0,5x is a wide-angle lens. 1x is the normal lens and 2x or 3x is a zoom lens. If you have the possibility to choose another lens on your smartphone, it is safe to use that. Just don’t use zooming in with your fingers.
Related: What is Composition in Photography? 7 Tips to Improve your Images

When you take pictures of people who are smaller than you or of pets, it is best to get down to their level. Bend your knees a little bit or crouch on your knees.
Forced perspective
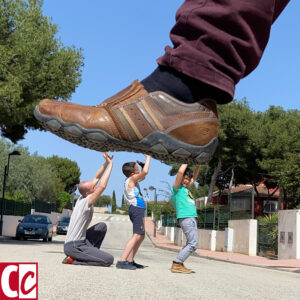
A funny technique in photography is forced perspective. I first saw it when pictures surfaced of people supposedly holding up the Leaning Tower of Pisa.
Other well-known examples are people who are supposedly crushed by a giant foot or who stand in a giant hand.
By the way, it’s not exclusively a photo technique. In films, it is used as well. The most famous example is The Lord of the Rings when the director played tricks to make the hobbits look half the size of the other actors.
Depth of field

By taking a certain point of view, we suggest depth in a photo. Another way to do that is through the depth of field.
Depth of field says something about what is clear and what is vague in a photo or in other words, what is sharp and what is blurred. It’s an excellent way to highlight the main subject in the image.
With a DSLR camera, the depth of field is easy to determine. The smaller the number of the focal point, f=1.4, the less depth of field in the photo.
Sometimes it’s hard to see where to focus. A rule of thumb is that 2/3 of the area in front of the focus point will also be in focus and 1/3 behind the focus point. So if you have to guess, you can try to keep that in mind.
As with the ability to zoom on a smartphone, the ability to choose a focal point is a digital affair. It is less easy to set up with the phone than with a DSLR.
On the other hand, usually, you can remove the blurriness in the camera app edit program, which you can’t do in a picture that is taken with a DSLR.
Viewpoint in photography
The different aspects to pay attention to when taking a position from which you shoot:
- Where is the horizon;
- What is the position of the camera in relation to the subject;
- Forced perspective;
- Depth of Field.
Do you have a favourite point of view? Tell me in the comment box below.




The photos you picked to illustrate your explanations are insightful, and very beautiful. Although I understand that ‘beautiful’ somewhat sounds as a cliché.
What I mean is that these photos invite me to take a closer look. Wondering what I see. How the colours shape my perceptions. For example, whether I appreciate the landscapes I see. The landscapes I appreciate, are the landscapes in which I would like to wander around.
Your explanations offer excellent ideas, and very attractive examples. Compliments!
Thanks so much for the compliment, Maria. I love your reason for admiring a landscape. Wandering around in nature is always so great, isn’t it? 🙂
Have fun, wandering and taking pictures!
I took photography classes before the pandemic began, they proved to be the perfect outlet for my creativity when lockdown started and I had to spend most of my free time in my backyard. Focusing on the essentials: balance, symmetry, rule of thirds, negative space, leading lines and viewpoints will make everything so much easier. Take it one by one, experiment as much as possible and then move on to the next one.
Weren’t you lucky to accidentally have a good hobby to pursue during the pandemic! Sound advice, take it one step at a time, that’s how we do not get overwhelmed and learn the most.
I took a lot of pictures too during the lockdowns. We have to do something to have an outlet, don’t we? 🙂
Thanks for your comment and addition, Angelina, have fun!
These tips are so helpful for a total beginner like myself. I find myself struggling to find the courage to pursue this hobby more. I don’t want to make this a second job but I would love to allocate more time to it so I can grow.
Is your course recommended for beginners?
Hi Mya, your starting point is right, just take more pictures and you will definitely grow. Don’t be discouraged. What can go wrong? Nothing. You’ll end up with a bunch of photos and you will notice progress in time, I can assure you.
I am not sure which course you are referring to?
If it’s the Photography Cheatsheets that are mentioned in the popup and that you can also find here, those are perfect for beginners. You will get an overview at a glance and can come back to them when you need a quick refreshing of knowledge.
If it’s the course at Wealthy Affiliate you are referring to, this is a course to start your own website and be an affiliate marketeer. This is a lot of fun because you could for instance start a website about your progress in photography.
Thanks for your comment and sensible question. Good luck!