
I used smoke firing on objects that already had their first round of firing in an electric kiln, called bisque or biscuit clay. This reduced the chance of breakage, and it also ensured that the objects were fired evenly and well.
Admittedly, my neighbours weren’t always quite pleased when I was firing this way. As you might know from a poorly ventilated fireplace, burning stuff that causes a lot of smoke can smell penetrating.
Yet, the results were so great that I risked their dislike. In this article, I explain how to smoke-firing ceramics yourself.
Some of the links are affiliate links. As an affiliate associate, I earn a small commission when you purchase any of the products offered through the shared links at no extra cost to you. This helps me to maintain this website and I thank you for supporting me.
Table of Contents
How to smoke-firing ceramics?
Historically, smoke firing is a very ancient method of creating ceramics. It turned raw clay into durable objects and made marvellous decorations with great smoke effects. If you have a gas or electric kiln, I recommend bisque firing first. The forms can then be placed in a self-built kiln with combustible material that smokes to decorate them.
Smoke is bad-smelling air
Years ago I participated in an art exhibition that had “Air” as its theme. I exhibited my work and gave a demonstration with a pit fire. Smoke-fired ceramics seemed to fit the theme well, in my view.
Smoke firing is something you can quite simply do yourself. You can actually dig a pit, use an oil drum, or you can build one with bricks. Nothing fancy is needed, at least for this part.
You do need bisque fired pieces. That might give you some trouble if you don’t own an electric kiln yourself.
The solution is to either buy biscuit work or to ask a ceramicist whether he or she is willing to fire it for you. I think it’s worth the effort, but maybe I’m biased!
The process explained in 8 steps

Use clay with a lot of grog
It doesn’t necessarily have to be white clay, but I suggest a light colour for the best result.
The clay I used for this had 40% grog, which is more than the usual 25%. Clay that is suitable for Raku will do very well. If you can’t buy 40% grogged clay, then make sure you choose a gross chamotte (0-2 mm).
Or – even more fun – make the clay yourself with clay powder and grog.
Think about what you want to use your item for. Smoked ceramics cannot be glazed, so if you want to decorate a vase this way, you can’t put water in it afterwards.
A fruit bowl or a storage container is possible of course. And decorative objects such as figurines or abstract shapes.
Bisque fired pieces
I always stated that I was a ceramicist, not a potter. The difference is a potter makes jars and bowls, a ceramist uses moulds, clay slabs, or builds the work with rolls.
Of course, I can appreciate a well-made bowl, I just didn’t like throwing them myself. Which doesn’t mean you can’t use pottery for smoke firing. I am not sure if you could throw them though because you need clay with a lot of grog.
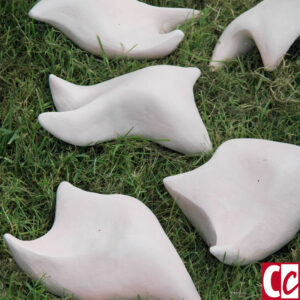
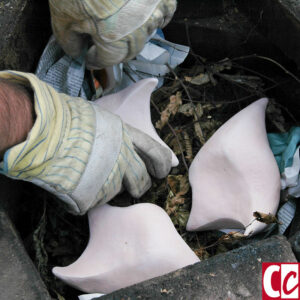
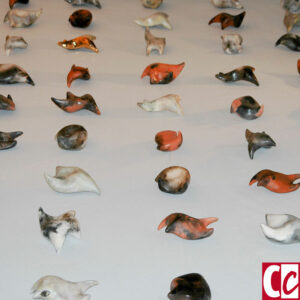
For the art contest, I made over 100 little figures with tentacles that had a resemblance to ‘flying in the air’. The clay was either white or terra cotta red or a mix of those two, giving several shades of pink.
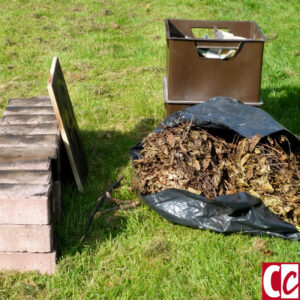

A list of what else is needed

- Bricks;
- Branches;
- Dry leaves;
- Sawdust;
- Kiln plate;
- Bucket with water to wash up;
- Water hose (just in case).
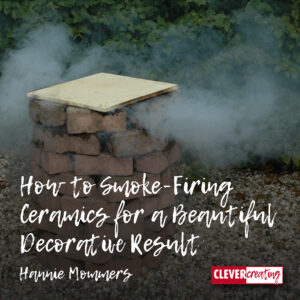
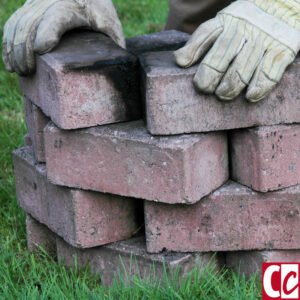
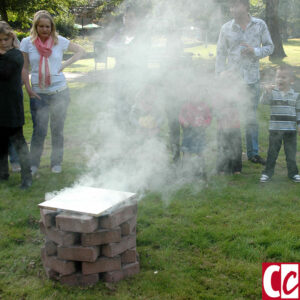
Building the kiln
Stack the stones around. Never mind the holes, they serve as air valves. I adjusted my brick kiln to the size of the kiln plate. The number of ceramic pieces to be smoked determines the height and can easily be adjusted with a row more or less. You can stack the stones without the need to be very precise.
Decide which burning material you want to use
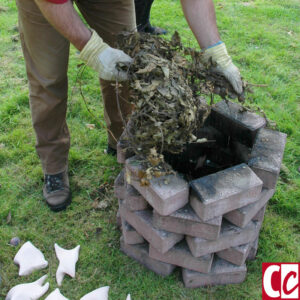
Your taste will define what material to burn and how much of it. You need branches to keep the fire going for a little while. Choosing big or small branches, a lot or a few leaves, and the quantity of sawdust determine the decoration.
Also, the way you put them in your kiln will have some influence on the decorative result. You won’t have total control over the result but you can guide it a bit.
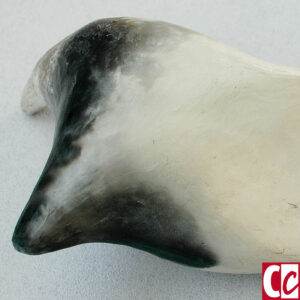
The black colour comes from a lack of oxygen, so big branches and leaves that ensure open areas in the kiln, make your ceramics lighter with more stains and spots, and little branches and sawdust will make your work darker and more even.
I layer the kiln like some kind of Lasagna. Branches, leaves, bisque, branches, leaves, bisque, branches, leaves, sawdust. The newspaper you see in the picture is to get the fire going, quickly and evenly inside.
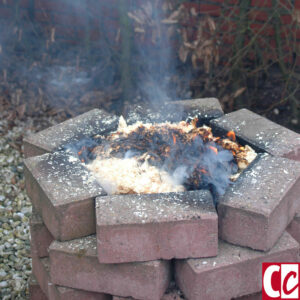
Once you’ve lit the fire, leave it alone until it has finished burning.
I always say I can’t cook, but this resembles cooking a lot, don’t you agree?
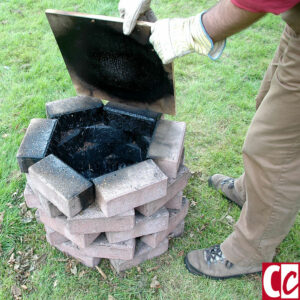
Cover the fire
Any kind of fireproof material will do. I used a plate from my electrical kiln because I had it anyway. It got black and stained because of the open fire of course, but that would be gone after a normal firing in my kiln.
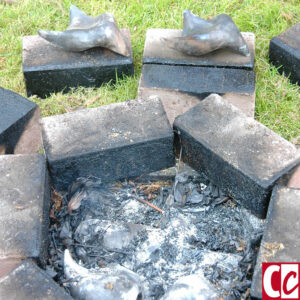
Cooling down
Don’t open the lid too soon. Even though the temperature won’t be as high as in a gas or electric kiln, if the ceramics is too warm and gets exposed to cold air, it might crack.
As you can see in the picture the figurines end up in a pile on the bottom, which means you have to think through the way of layering. It will take the branches between the bisque some time before they vanish, but eventually, the top layer will go down.
The smoother this process takes place, the more chance nothing breaks.

Wash up
There will be quite some dust and ashes on the ceramic pieces. You can wash that off easily by putting the forms in a bucket of water and rinsing them. Of course, you could also do this under a running tap but then junk gets into the drain and the wastewater gets polluted.

If you are not satisfied with the way the pattern turned out, simply fire the figure again in the gas or electric kiln. It will come out pure white and you can start over.
The best way to enhance the pattern is by rubbing the figure with beeswax. This creates a beautiful silk-matt shine. Preferably use the old-fashioned kind of beeswax. Rub it in with a soft cloth. The result will be great!
Use a little sponge to apply the wax and an old cotton cloth to rub it until it shines. You will have to repeat this process once in a while as the wax has the tendency to vanish in time.
The installation “Fumes Purify”, 2008

For the art contest, I laid 100 forms on the floor of the entrance of a chapel. The visitors could not walk around it but had to peak through the open door. In a hidden alcove, I burned incense. Given the theme was ‘Air” and the installation was in a chapel this gave an extra layer to the entire piece.
Outside I gave a demonstration in smoke firing. It amazed me people didn’t mind standing in the smoke. Personally, I preferred standing on the other side of the kiln. This didn’t prevent my clothes from stinking afterwards but it did make it easier to breathe during the demonstration. 😉
It was funny. I thought I was participating in an exhibition, some other pieces of mine were standing in the park as well. When the exhibition was nearly coming to its end, I heard it was a contest. Can you imagine how happy I was, winning the first prize!

Smoke-firing ceramics
At some point in my life, I emigrated to Spain, so I sold all my ceramics tools and stuff. But I still have quite a few of my smoke-fired pieces. I love them.
To see another way of decorating ceramics you can have a look at the article Combining Ceramics with Linocut and Stencils.
Have you ever used this technique? Tell me in the comment box below.
This article is an update. Originally published on 28-03-2013.

Dear Hannie,
Thank you for your generosity for sharing your knowledge.
Would you please tell me what can I do if I want to glaze my ceramic pieces after smoke-fire? Or it is not possible at all?
Hi Aki. Good question, and no, unfortunately, you can’t glaze your work after smoke-firing. You might have read my tip that if you are not satisfied with the way your work comes out of the smoke kiln, you can put it back in the electric kiln. Unglazed work will come out in its original colour.
I am not sure what the glaze will do if you try it anyway. I have never tried it and I can imagine that the glaze will react oddly because of the burning process. If you try, I am very curious how it will react, so please tell me in that case.
Alternatives are rubbing your work with bee wax or varnishing it. If you use bee wax, you’ll have to repeat the process once in a while because the wax will vanish in time.
I hope this answers your question? Good luck and have fun. 🙂
Hello Hannie.
Amazing. This must be a century-old technique, isn’t it? Never knew this existed. Are there any famous statues or ceramic pieces made with this technique?
I have 2 left hands, so unfortunately ceramics is out of my league, but I love clay stuff, vases, pots. And abstract ceramics. Once I was in the south of France and visited an exposition of ceramics. Beautiful. Half were figurative pieces, the other half abstract. Some even a couple of meters high. Amazing the colors they were able to give to their pieces.
This reminds me that I should buy more ceramics. I love them so much and they are very decorative in the house. But in the garden would be nice too. Although someone last told me not all ceramics can stay in the open air. Not every type of ceramic seems to be able to resist rain, frostbite, and sunshine. Is that so? How can I tell when I buy a piece?
Thanks for such an interesting article. You should write more about ceramics. Bye.
Hi Richard, awesome, your enthusiasm! It pleases me you like ceramics so much. And I bet your visit to the south of France was Vallauris, wasn’t it? The village is renowned for its ceramics biannual, and you are very right, the exhibitions are wonderful.
When you buy ceramics directly from the artist, you can ask him or her whether the work can be put outside. If you are buying in a gallery it depends on the knowledge of the one helping you. Usually, the owner is skilled enough to give you an answer but if you are helped by an assistant, you won’t always be so lucky.
Two things are very important for outside ceramics:
* The shape should be ‘water-draining’, meaning there are no spaces for water to collect after a rain shower;
* The clay must contain a lot of chamotte (looks like small stones), at least 25%, and no less than 40%. You can recognize that by the skin of the work. If it is as smooth as a flower pot, for example, there will be no chamotte in it;
* It is an advantage if the work is glazed. Unglazed clay will hold moisture more easily. Freezing moisture expands and will crack the ceramic.
I hope this is of some use to you. Thanks for your comment and good luck with your collection!
Great idea! I never had thought of doing something similar! My wife loves ceramics so she will surely appreciate the idea. It doesn’t look so hard to follow the whole process and the end result looks phenomenal. We have a big enough space for everything needed so we will surely try it out. Thank you!
Oh, I am jealous that your space is so big, Stratos, I always felt guilty when I smoke-fired in my garden. And you’re right, this is a fairly easy process.
It is also great to start with if someone is an absolute beginner and doesn’t know yet whether clay is suitable. Before investing a lot of money in a kiln, this way one can test the water first.
Thanks for your comment and I hope your wife will give it a go.
The bricks you use are they ordinary bricks or fire bricks?
Hi Laura, they’re just ordinary bricks. Leftovers from a rebuilding job.
Let me know if you have more questions and do show the result if you have tried this technique. 🙂
Good luck,
Hannie
Realmente lindo!
Thanks!