
Ceramics can be produced in several ways. Each method will result in a different surface.
You can press the clay in moulds, hand-build an object, or merge slabs.
Depending on completion or decoration it can be necessary to smooth the surface as best as possible.
How to smooth the surface of your clay object? I’ll explain my methods in this article.
Some of the links are affiliate links. As an affiliate associate, I earn a small commission when you purchase any of the products offered through the shared links at no extra cost to you. This helps me to maintain this website and I thank you for supporting me.
Table of Contents
How to smooth the surface of your clay object?
Handmade tools like normal or shaped credit cards or wooden beads on a handle are perfect for smoothing your ceramics. So are light bulbs.
Smoothing ceramics the right way
For a novice ceramist, it is best to start with grogged clay.
Grog was called ‘pebble-stones’ by my students but is fired clay that is ground up and added to clay in varying percentages, depending on what kind of work you plan to make.
To be more precise: grog, which is also called chamotte, fireclay or firesand, is calcined clay with a high amount of aluminium.
Grog has the advantage of not breaking easily in the kiln. The downside is that the surface can look rough.
Different types of clay
You may be tempted to reach for a more fine-textured piece of clay, yet my best advice is to start with coarse grog. Once you’ve acquired the knack, you can move on to finer-grogged clay.
Most chamotte clays either contain 40% or 25% grog. The rough chamotte is 0-2 mm and the finer kind is 0-1 mm or even 0,2 mm. You use this grogged clay for hand-building. If you use the potter’s wheel, you should choose clay without chamotte or with a very fine grain, otherwise, you will hurt your hands.
Smoothing tips
These are tips to get the clay surface you desire.
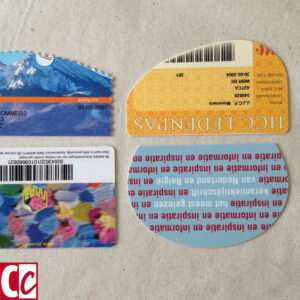
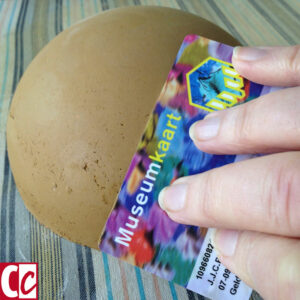
#1 Cost nothing, after all, we use plastic cards all the time
An expired bank card, an access card to the gym or a gift card I got from a perfumery: when I looked inside my wallet I had numerous cards I all got for free and were of no use anymore.
They’re really handy to smooth the clay surface with. Since I had plenty of cards, I had cut several into kidney-shaped or round forms for specific projects.

And another tip – not for preening, but the opposite – I cut some cards with pinking shears that I used to roughen the edges of the clay. I needed those when I was building with slabs.
Related: How to Make Perfect Slabs of Clay for Hand-Building Ceramics
#2 Costs a little, a tool I used a lot

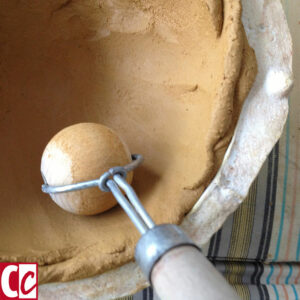
I made a lot of my ceramics with the help of moulds. As you probably know, it’s important to avoid air pockets in the clay, so you have to press the clay into a mould very well.
If you push the clay into the mould with your fingers, you can feel if the thickness becomes the same everywhere. That is important but you can’t exert as much force as with this homemade tool.
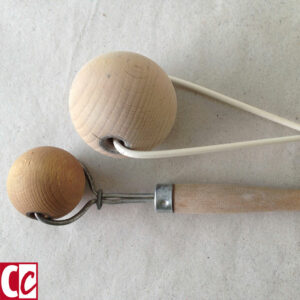
With a big wooden bead on a handle, you can rub the clay into the mould, thus making both the inside and the outside clean and flat.
For lack of a better solution, I used thick iron wire as a handle until I got an old-fashioned washing brush from a friend. The stem fitted perfectly around the smaller one of the beads.
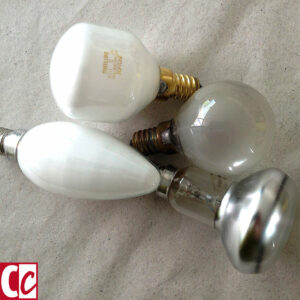
#3 A second life for failing light bulbs
At the beginning of my clay days, I used a spoon to polish the surface of my ceramics and hated the metal stains that emerged. They didn’t vanish when fired in the kiln, unfortunately.
Failing light bulbs were a perfect solution to this problem. Not only do they leave no marks, but I also found them easier to hold.
And because our craft is, in reality, such a ‘dirty’ profession, it is nice to know that we can give a second life to broken things this way.
I had several kinds, so there was always a lamp that fitted the surface.
Related: Start Making Ceramics Now with Clay Tools from the Kitchen Drawer

Extra tips
If you intend to use slip on the finished form, it’s best not to smooth the surface too thoroughly. When the clay molecules are pressed too tight against each other slip or engobe will not attach very well.
On the other hand, if you plan to put your work in the smoke or raku kiln, it is better if the surface is smooth and polished. The smoother the better.
What not to do when smoothing clay
You may be tempted to run a damp sponge over the surface. I did so in the beginning, always surprised that when it dried, the surface was still rough. That didn’t help.
Sanding the leather-hard object with sandpaper was another method that didn’t work well. The grog will cause cavities. In addition, clay dust is very unhealthy, so sanding is not recommended from that point of view either.
If you like the surface that is created after sanding, at least put on a good mouth mask so that you don’t get dust lungs.
You should try out for yourself when is the best time to apply one of the 3 methods I described above. Sometimes you can start when the work has not yet dried, sometimes it is better to wait until it is leather-hard.
Good luck!
Are these helpful tips for you? Please let me know in the comment box below.
This article is an update. Originally published on 9-05-2013.

Great ideas! I use a rock to burnish my pots. Smooth, small enough to hold easily; my favorite rock is flat on two sides and somewhat oval in shape.
Thanks so much for the extra tip! Good luck on your ceramics. 🙂
Hallo,
Die Idee mit der Perlenkette ist super, danke, werde es bald ausprobieren.
Great, Ingrid, it’s marvellous to know that people are still benefitting from my tips. 🙂 Sorry, I reply in English, I understand and speak German but writing it is too hard for me.
Thanks! I’ve been designing my own tools for years, thanks, these are great! It would be good with different shaped beads to create things like a wavy surface, or with patterned beads. I made one with a tiny watch gear, used for transferring patterns by poking thru. Great job!
That is so great, Kim. Marvellous to hear and thank you for adding tips of your own. And you are quite right, patterned beads are a great addition.
Thanks for your comment and have fun making beautiful things. 🙂
Tof, ben weer een beetje wijzer 🙂
Geweldig, Emmy, blij dat te horen. Heb je mooie dingen gemaakt en welke van de 3 technieken heb je daarbij gebruikt?
Hi. Great idea about using the light bulbs. Many thanks for sharing your ideas. Ramz
You’re welcome 🙂 I am always glad if somebody profits from my information!
What good ideas! I’m especially eager to try the wooden bead tip. Thank you!
You’re welcome, Irene. It works like a charm! 🙂
Thanks for sharing.
You’re welcome. I am so glad to have been of help. Good luck with your ceramic objects.
Very helpful. I especially like the bead idea.
Thanks, Janet. Yes, it’s one of those tools you could use every day 🙂
love your ideas and hints! Especially the wooden bead – clever! Thank you for sharing your wise thought about clay… Carol
Good to hear, Carol. Thanks for the heads up 🙂
Very useful. Thank you.
Greetings
Fátima Ferreira
Thanks Fátima. I had a look at your page. Great work you have!
Have a great day, Hannie
Merci pour vos très bon conseils !! à suivre car cela nous aide ! Bonne journée !
De rien. Je suis heureux que cela vous a aidé 🙂